But as usual, a growing need creates a growing offer. Many students now are convinced that if they go for computer sciences they will nail it and maybe that was true 10 years ago, but now, a new generation of egineers are being made while you read this useless crap. Software consultant companies are increasing the already high expectations of a recently graduated student. Yesterday they needed programmers, now they need "Software architects" and if this continues, tomorrow your entire Ivory Leage education will be useless.
I'm not saying that college education is useless (by all means stay in school, you are not Bill Gates, you are not Steve Jobs and certanly you are not Mark Zuckerberg), what I'm trying to tell you is that when you graduate, companies will know that you can program like any other graduate. They will start asking if you know how to use the tools used to become a usefull programmer. Sadly for you, college will not teach you that.
One of the "additional but essential tools not beign taught at school" is a repository. Knowing how to use one is a huge point at your favor when you look for a job as a developer.
A repository is a collection of organized files available for a developer to consult. You can store anything you want in a repository: images, documents, songs and yes, an entire software development project.
When should I use a repository?
Everytime.
When you work in the same project with at least 1 more person, you should use a repository. Imagine you are doing the core of an app and your friend helps you with the layout. Whenever you make changes, your friend needs to see those changes to continue building the layouts. You could handle an USB with your entire project every time but that's for college kids. You are a pro, remember?
A repository will store your changes and your friend will update his project to match yours and after he's done he will also "commit" his changes so you have the project updated. Brilliant.
A repository will also help you even if you are the only developer. If you are planning to create a huge module for an app, you could create a "branch" in your repository so if something goes horribly wrong, you can go back to your lastest stable code version. Amazing!
Working with a repository is a clear indicator that you can work in a big development, and usually that's what your employer whants to hear from you. You might want to leave behind the old "I work better on my own, I can't stand working in a team" You are not in college anymore.
How does it work?
When you start working in a project, usually you download the repo in your local IDE. That's your "local". When you download the repo, all the changes you made are in your local and are not affecting the project. Once you are done with some changes or additions, you "commit" your changes and update the repo so everyone can see what you just made and now your local is "up".
The same happens for your peers, they will update their "locals" so they have your new changes and at the end of the day they will "commit" their changes updating the repo with everyone's changes.
Of course there are some limitations, if you work in the same file at the same time someone else does, you will have "conflicts" and the repo will reject any changes unless the conflicts are solved.
Can I work with a repository in Android Studio?
Android Studio is the official Android Development IDE supported by Google. Of course it does. It's on the title of the post.
So given this useless introduction, lets start using repositories for our Android Studio Projects,
Intall Git Bash
Before we can continue, we need a client for Git. Check on how to install it in yout computer here: https://git-scm.com/book/en/v2/Getting-Started-Installing-Git
Creating a repository.
I strongly recommend using Bit Bucket as a service for a repository. I have been using it for some time now and it's a very solid and free solution to store repos.
Create a Bit Bucket account.
Do I need to explain how to do this? Just go to Bit Bucket and follow the instructions.
Create a new repository.
Once you hit the Dashboard Screen, select Create from the upper-right option in the navigation bar.
 |
| Select Create > New repository |
Now let's configure our repository in the create repository form.

Add a name like "MyFirstRepo" or something easy to remember and easy to type. I usually use the first thing i can find on my desktop like a "mousepad". This is not the name of the project, it's the name of the repo.
Also, you can select the languaje so let's set it to Android. You can leave the rest as it's shown in the picture above then click "Create repository".
Once it's complete, you will see the empty overview page:
 |
Link to Bit Bucket.
Open your git bash then navigate to your local android studio project. Once there execute the following code:
git remote add <your repository url as it is in your clone command>
If you don't know your project url you can locate it at Bit Bucket in the clone selector:
 |
| Don't copy the "git clone" command, only the complete URL. |
Once it's done, your local is now linked with your Bit Bucket repository.
In Android Studio, select VCS > Enable Version Control Integration and select "Git" from the spinner in the pop up window then click "Ok".
 |
| Click ok to let Android Studio kno that your project will work with a repo. |
Your Android Studio project is ready to work with a repository.
Add components and commit changes
As you can see, many files now are highlighted in red! Well this means that those files are not beign added to the repository and you could have "conflicts" later because those files are not up to date.
 |
| Red files are not beign updated. |
 |
| I have added the AndroidManifest.xml file. It's ready to uploat to the repo |
 |
| My entire project is ready to upload. |
When you add files like this, it also means that you are going to keep track of all the changes performed on those files.
Now ets first commit our changes. When we commit we are saving the changes to be uploaded. Those changes are not going to be uploaded unless we "push" those changes.
Use <Ctrl+K> to commit your changes or go to VCS > Commit Changes.
 |
| The Commit changes screen will let you review your files before commiting them |
After the commit is done, we are now ready to "push" our changes to our remote repository. Open the Push window with <Crtl+Shift+K> and select "Push".
Once those changes are done, you can go back and update your bitbucker page to see that you have uploaded the project.
Download the project in a new workplace
Now that the project is up. It's time to share it with your peers and make the right use of a repository instead of just sending USB or e-mails with zip files.Share your project from the repository.
Go to your bitbucket account and lets open our repository. In the Overview screen you will se a "Invite users to this repo" rectangle. You will be able ro share the repo to users with just an e-mail and leave the registration for them.
 |
| Click in 'Send invitation' to invite new co-workers to your repo. |
| Copy the entire URL for downloading the repo |
 | ||
| You can change the Directory Name |
When you click on Clone Android Studio will start downloading or 'cloning' the remote repository and you will have to set some configurations to build a new project from it. Select This Window to keep only 1 Android Studio Project open at the moment.
Clic on Import Gradle project when the pop up message shows: 'Unlinked Gradle project?'. This will let Android Studio to grab the project configuration in the remote repository and apply it to your local.

If you miss the temporary messages, you can always check them again in the event log by executing <Ctrl+Shift+A> and writting 'Event log' in the search bar.
We are going to use our own gradle distribution and keep the format to .idea then click Ok
 |
| Keep this configuration |
Now we are adding files to git. We are not uploading nothing yet, we are adding files to our .git in our local. Let's select them all and clic ok.

Once it's done, you will be able to see a regular Android Project configured in your Project Navigator. Open it by executing <Alt+1>.

Finally, let's make sure this is correclty configured as an Android project by opening again our Event log and clicking in Configure in the event 'Frameworks Detected!'.
If you can see 'No frameworks are detected' the clone is complete.

Let's build our module by selecting Build>Make project or we can just execute <Ctrl+F9>.
Now that we have computer A and computer B working in the same directory we are going to keep the best practices by syncronizing before commiting. This is a golden rule that will reduce several headaches.
Computer B: Commit some changes.
After you download or clone a repo for the first time as a new project, the repo will clone with the HEAD version, meaning that will download with the lastest updates, so we can trust that what we just cloned is updated. When computer B commits a change, commputer A will have to update to make sure it's always at the same version that computer B. Let's see how this works.
In computer B, im going to add 2 changes:
Add a new file
I will add a simple layout file in the layout resource directory.
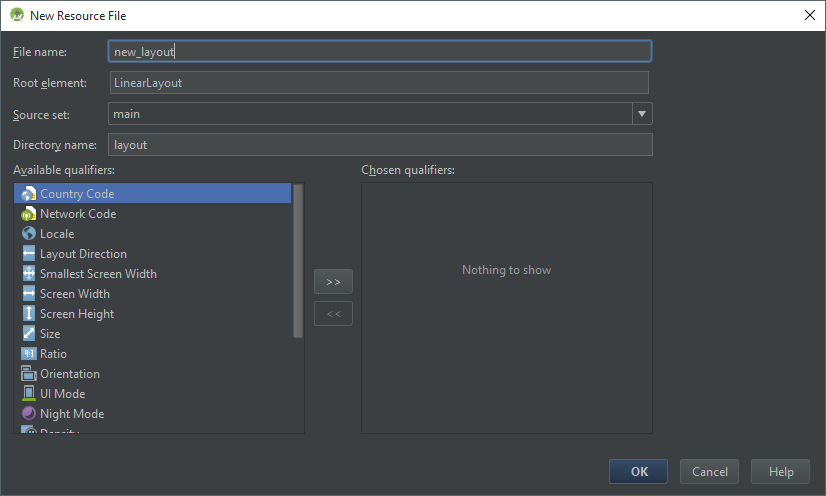
Now that it's created, Android Studio will detect tat we are working with a reposiroty, so it will ask us if we want to add the file to Git; in the first part we figured out that by "adding files" to the repo we are 'tracking' them. Since we want this file to go to our bitbucket repository, we will click in Yes.

You can always add them later like we did in the first part of the tutorial.
Once is created and added to the 'tracking list' or just 'added' you will see familiar things here; the file name has changed to a green color meaning that the file is ready to go to the repo. The gray name files are files that have no changes and are up to date.

2. Modify a file
Adding a file is easy, now we are going to edit an existing file and commiting the changes. In this case, 'activity_main.xml' is a simple layout that was uploaded to the git when we pushed it to our bitbucket repo.
I will just add some lines of code.

After the edits, the color of the name of this particular file will change to blue. This means that the file has been edited,. If we push the changes, this file will not go to our repo, only the 'new_layout.xml' file. We wan't to apply the changes so lets execute <Ctrl+K>.
 |
| This is the file comparison screen |
Now Android Studio finds out that our recently modified file is different from our version in the repository. It will highlight the line of code where the file has been edited. This feature allows you to see the changes and review them before executing a commit. Remember, commit confirms your changes and push sends those changes to the repo.
Since it's ok, we are going to click on Commit. Android Studio will warn us because there is actually a 'Warning' on the file. Most of the warnings are related to Hardcoded strings and some other recomendations that are not compiling with best programming practices. Thankfully, this is a tutorial on Git and not in Best Practices for android, so let's just skip to review those warnings and click in Commit.
 |
| Skip to review and click in Commit |
Don't forget to specify a 'Commit message'. Those are usefull to know what are you doing with those editions.
After the commit, the repository is updated with your changes.
In the next part, we will solve conflicts, a common headache when working with repositories.
Thank you for reading.


