Wednesday, November 11, 2015

Work with remote repositories with Android Studio. A must-know guide

This is a great time for developers, for programmers and for computer science enthusiasts. The need of bigger and better technologies are changing the despicable term "nerd" and transforming it into an acceptation that says: "Anyone that has skills with a computer has now better chances to actually become a prodictive member of modern society"

But as usual, a growing need creates a growing offer. Many students now are convinced that if they go for computer sciences they will nail it and maybe that was true 10 years ago, but now, a new generation of egineers are being made while you read this useless crap. Software consultant companies are increasing the already high expectations of a recently graduated student. Yesterday they needed programmers, now they need "Software architects" and if this continues, tomorrow your entire Ivory Leage education will be useless.

I'm not saying that college education is useless (by all means stay in school, you are not Bill Gates, you are not Steve Jobs and certanly you are not Mark Zuckerberg), what I'm trying to tell you is that when you graduate, companies will know that you can program like any other graduate. They will start asking if you know how to use the tools used to become a usefull programmer. Sadly for you, college will not teach you that.

One of the "additional but essential tools not beign taught at school" is a repository. Knowing how to use one is a huge point at your favor when you look for a job as a developer.

A repository is a collection of organized files available for a developer to consult. You can store anything you want in a repository: images, documents, songs and yes, an entire software development project.

When should I use a repository?


Everytime.

When you work in the same project with at least 1 more person, you should use a repository. Imagine you are doing the core of an app and your friend helps you with the layout. Whenever you make changes, your friend needs to see those changes to continue building the layouts. You could handle an USB with your entire project every time but that's for college kids. You are a pro, remember?

A repository will store your changes and your friend will update his project to match yours and after he's done he will also "commit" his changes so you have the project updated. Brilliant.

A repository will also help you even if you are the only developer. If you are planning to create a huge module for an app, you could create a "branch" in your repository so if something goes horribly wrong, you can go back to your lastest stable code version. Amazing!

Working with a repository is a clear indicator that you can work in a big development, and usually that's what your employer whants to hear from you. You might want to leave behind the old "I work better on my own, I can't stand working in a team" You are not in college anymore.

How does it work?


When you start working in a project, usually you download the repo in your local IDE. That's your "local". When you download the repo, all the changes you made are in your local and are not affecting the project. Once you are done with some changes or additions, you "commit" your changes and update the repo so everyone can see what you just made and now your local is "up".

The same happens for your peers, they will update their "locals" so they have your new changes and at the end of the day they will "commit" their changes updating the repo with everyone's changes.

Of course there are some limitations, if you work in the same file at the same time someone else does, you will have "conflicts" and the repo will reject any changes unless the conflicts are solved.

Can I work with a repository in Android Studio?


Android Studio is the official Android Development IDE supported by Google. Of course it does. It's on the title of the post.

So given this useless introduction, lets start using repositories for our Android Studio Projects,

Intall Git Bash

Before we can continue, we need a client for Git. Check on how to install it in yout computer here: https://git-scm.com/book/en/v2/Getting-Started-Installing-Git

Creating a repository.

I strongly recommend using Bit Bucket as a service for a repository. I have been using it for some time now and it's a very solid and free solution to store repos.

Create a Bit Bucket account.

Do I need to explain how to do this? Just go to Bit Bucket and follow the instructions.

Create a new repository.

Once you hit the Dashboard Screen, select Create from the upper-right option in the navigation bar.

Select Create > New repository

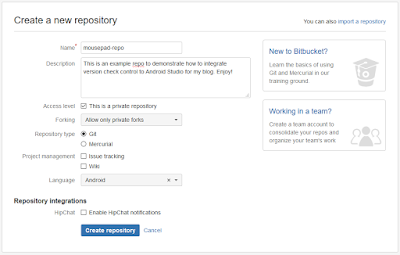
Now let's configure our repository in the create repository form.


Add a name like "MyFirstRepo" or something easy to remember and easy to type. I usually use the first thing i can find on my desktop like a "mousepad". This is not the name of the project, it's the name of the repo.

Also, you can select the languaje so let's set it to Android. You can leave the rest as it's shown in the picture above then click "Create repository".

Once it's complete, you will see the empty overview page:


Now let's go to Android studio and use a project to start adding items to the repo. I have created a very simple Android Project using the templates to demonstrate only.

Link to Bit Bucket.

Open your git bash then navigate to your local android studio project. Once there execute the following code:

git remote add <your repository url as it is in your clone command>

If you don't know your project url you can locate it at Bit Bucket in the clone selector:

Don't copy the "git clone" command, only the complete URL.

Once it's done, your local is now linked with your Bit Bucket  repository.

In Android Studio, select VCS > Enable Version Control Integration and select "Git" from the spinner in the pop up window then click "Ok".


Click ok to let Android Studio kno that your project will work with a repo.

Your Android Studio project is ready to work with a repository.


Add components and commit changes


As you can see, many files now are highlighted in red! Well this means that those files are not beign added to the repository and you could have "conflicts" later because those files are not up to date.

Red files are not beign updated.
Let's solve this problem by selecting any "red" file and hit <Ctrl+Alt+A> or rigt click on it > Git > Add. This means that the file will be updated when you "commit" the changes.

I have added the AndroidManifest.xml file. It's ready to uploat to the repo
Let's to the same for all our project. I will collapse the "app" directory and do the same as before to add the entire directory.

 My entire project is ready to upload.

When you add files like this, it also means that you are going to keep track of all the changes performed on those files.

Now ets first commit our changes. When we commit we are saving the changes to be uploaded. Those changes are not going to be uploaded unless we "push" those changes.

Use <Ctrl+K> to commit your changes or go to VCS > Commit Changes.

The Commit changes screen will let you review your files before commiting them
You will see all your files organized. It highligts the files to be commited and the code. Since all of them are new files, its everything new. Add a few words to describe your commit and click in "Commit".

After the commit is done,  we are now ready to "push" our changes to our remote repository. Open the Push window with <Crtl+Shift+K>  and select "Push".

Once those changes are done, you can go back and update your bitbucker page to see that you have uploaded the project.

Download the project in a new workplace

Now that the project is up. It's time to share it with your peers and make the right use of a repository instead of just sending USB or e-mails with zip files.

Share your project from the repository.

Go to your bitbucket account and lets open our repository. In the Overview screen you will se a "Invite users to this repo" rectangle. You will be able ro share the repo to users with just an e-mail and leave the registration for them.

Click in 'Send invitation' to invite new co-workers to your repo.
Once they configure their accouts they will have to copy the URL provided in their Overview screen of the repo.

Copy the entire URL for downloading the repo
The URL will be used to download the project from Android Studio, so let's go to Android Studio and click on File>New>Project from Version Control>Git


You can change the Directory Name


When you click on Clone Android Studio will start downloading or 'cloning' the remote repository and you will have to set some configurations to build a new project from it. Select This Window to keep only 1 Android Studio Project open at the moment.

Clic on Import Gradle project when the pop up message shows: 'Unlinked Gradle project?'. This will let Android Studio to grab the project configuration in the remote repository and apply it to your local.


If you miss the temporary messages, you can always check them again in the event log by executing <Ctrl+Shift+A>  and writting 'Event log' in the search bar.

We are going to use our own gradle distribution and keep the format to .idea then click Ok

 
Keep this configuration

 
Now we are adding files to git. We are not uploading nothing yet, we are adding files to our .git  in our local. Let's select them all and clic ok.


Once it's done, you will be able to see a regular Android Project configured in your Project Navigator. Open it by executing <Alt+1>.


Finally, let's make sure this is correclty configured as an Android project by opening again our Event log and clicking in Configure in the event 'Frameworks Detected!'.

If you can see 'No frameworks are detected' the clone is complete.


Let's build our module by selecting Build>Make project or we can just execute <Ctrl+F9>.

Now that we have computer A and computer B working in the same directory we are going to keep the best practices by syncronizing before commiting. This is a golden rule that will reduce several headaches.

Computer B: Commit some changes.

After you download or clone a repo for the first time as a new project, the repo will clone with the HEAD version, meaning that will download with the lastest updates, so we can trust that what we just cloned is updated. When computer B commits a change, commputer A will have to update to make sure it's always at the same version that computer B. Let's see how this works.

In computer B, im going to add 2 changes:

Add a new file

 I will add a simple layout file in the layout resource directory.


Now that it's created, Android Studio will detect tat we are working with a reposiroty, so it will ask us if we want to add the file to Git; in the first part we figured out that by "adding files" to the repo we are 'tracking' them. Since we want this file to go to our bitbucket repository, we will click in Yes.


You can always add them later like we did in the first part of the tutorial.

Once is created and added to the 'tracking list' or just 'added' you will see familiar things here; the file name has changed to a green color meaning that the file is ready to go to the repo. The gray name files are files that have no changes and are up to date.


2. Modify a file

Adding a file is easy, now we are going to edit an existing file and commiting the changes. In this case, 'activity_main.xml' is a simple layout that was uploaded to the git when we pushed it to our bitbucket repo.

I will just add some lines of code.


After the edits, the color of the name of this particular file will change to blue. This means that the file has been edited,. If we push the changes, this file will not go to our repo, only the 'new_layout.xml' file. We wan't to apply the changes so lets execute <Ctrl+K>.

This is the file comparison screen


Now Android Studio finds out that our recently modified file is different from our version in the repository. It will highlight the line of code where the file has been edited. This  feature allows you to see the changes and review them before executing a commit. Remember, commit confirms your changes and push sends those changes to the repo.

Since it's ok, we are going to click on Commit. Android Studio will warn us because there is actually a 'Warning' on the file. Most of the warnings are related to Hardcoded strings and some other recomendations that are not compiling with best programming practices. Thankfully, this is a tutorial on Git and not in Best Practices for android, so let's just skip to review those warnings and click in Commit.

Skip to review and click in Commit

 Don't forget to specify a 'Commit message'. Those are usefull to know what are you doing with those editions.

After the commit, the repository is updated with your changes.

In the next part, we will solve conflicts, a common headache when working with repositories.

Thank you for reading.
Sunday, November 8, 2015

Revert changes in Android Studio

We all have been in the situation were we have to go back and undo some changes and re-write our code. But what happens when <CTRL+Z> is not enough? What do we do when we have to go back and start over?

Android Studio has an amazing feature which saves all your changes and let you check a history or "log" for all the changes you have been doing. This log catches when you delete a file, when you reformat a class, when you re-writte a function; everything.

To access it, you just have to right click in your project then select Local History > Show History.


The history window will let you track all the changes committed. Once you find the change you want, right click on it and then select "Revert".

The status of the project will be updated. Deleting all items that were created before that given change so you have to choose carefully if you want to revert to a given change.

This feature can store all the data of the changes of your project and will let you revert any catastrophic changes that <CTRL+Z> can't.

Thank you for reading

Friday, November 6, 2015

Themes for Android Studio? Yes!

Android Studio has been the official Android development IDE for long time since the earliest versions were released.

Many enthusiasts found out that the features in the IDE were very helpful and as the official Android tool it was a delight to see many features like the layout editor and the wizards to build pre-cooked code.

But let's be honest, as I menctioned in the 6 Reasons to develop Android apps in Android Studio, the Darcula theme is one of the most popular features in the IDE and with some tweaks It can just get much better.

Tangid Color Theme by bhrgunatha.

Color Themes is an awesome site were you can download and apply many code themes made by other programmer enthusiasts. It will allow you to sort the available themes so you can find dark or light themes but I strongly recommend to browse the gallery as it is because all of them are just beautiful. Do you want to know the best part? NO REGISTRATION NEEDED!


When you download a theme, it will be as a .jar file. All you have to do is select File > Import Settings > Navigate to the .jar > Ok. After restarting the IDE the new theme will be as the default. Easy!.

Yes, I downloaded Tagid theme twice. My bad


Go ahead a give a thumbs up for the guys at Color Themes so they can continue doing this for all the community.

Thank you for reading.


Wednesday, November 4, 2015

This is why a graphic designer is unemployed.

... And you could be next as a freelancer.

The other day I was doing my very important internet stuff to help me procrastinate when I found several quotes in thypographic images from Zerouno that claims to be "ridiculous" and made from "clients from hell" with some request that (I think) sometimes the client asks. The collection is named "What not to say to a graphic designer" and it basically explains why they struggle so much to find a job.

Now, I am not a graphic designer and I don't know squad about typography or colors or the whole graphic elements but I can relate to many graphic designers that sometimes could claim that their client or customers are hard to understand and harder to make them understand, but when you start complaining about everything that the customer do you end up losing something very important in this business: professionalism.

Avoid becoming such a negative freelancer and take a look at the following

© Zerouno. www.zerouno.org
If I understand this correctly, you are not supposed to make a suggestion to the guy you are paying. How could you dare to offend him by making a request or a suggestion? I mean yes of course, you are the one that knows your business, you know your market, you know your competitors, you know the target and you know where is going to be used the design: you have context but this designer, that has 8 hours working in the logo and of course, he/she knows much more than you.

Remember this as a freelancer: You are hired to fit a business needs, a business that is not yours, with foreign ideas. When you become the CEO of your own company, you can lead those ideas but in the meanwhile show some respect to the people that pay you and trust you with the job.


© Zerouno. www.zerouno.org
So you are telling me that you are rejecting the opportunity to show that you are that good and refusing to actually do your job?

Sometimes the employer will ask you to do changes trusting that they are easy to do. If that is not the case you should explain why; you have to avoid situations where they add free work for you. You have to bee very clear because the employer doesn't know about the topic, you are the expert and you could tell if that only take a minute or not. Most of times the employer would understand you and then you could apply extra feeds to add unexpected work loads. Money!

But when it takes only one minute you should always do it. Shows professionalism, shows that you are very good at it and will make your employer more likely to work with you again. Remember: It's your job, you have to do it!

© Zerouno. www.zerouno.org
What is wrong with you? This is the best thing it could happen!

They are offering something that many people died for: Freedom! And you get annoyed? No wonder why you still living in your parents home at your 30's. I just have no words for this one.

© Zerouno. www.zerouno.org

So, the employer must know how to do a vector image with image processing software. Care to tell me what are you being paid for?

Most employers hire people because they don't know how to do that specific job! Many people with small business don't know how to use dedicated software and MS Paint or Word is the only thing they know. If they knew how to do it, you would have no job. The answer to questions like that is always "Any format is ok".

© Zerouno. www.zerouno.org

As told before, never waste an oportunitty to demonstrate that you know about the sibject. When asked a question you have the responsibility to answer it so your employer is well informed to make a desition. He/she depends on you to scrap ideas that are wrong. If you disagree you have to make it crystal clear so it's understood and an error is avoided. When your employer is stubborn, you will have to suck it up and deal with it. Remember, it's not your business, it's not your idea and there is no room for your frustrated dreams.


© Zerouno. www.zerouno.org

Classic, the boss gave you the "It's ok" So you signed the app in production and when you test it in a real device it crashes. The worst part? You saw it comming.

Having a moron employee is perfect. It's the ideal tester, he could warn you about so many things that you are not seeing from your perspective. Of course he can't see what you trained eyes and senses can so it's your responsibility to make it clear for him what is going to happen if you let something pass. If it crashes it's your fault and no one else's.

© Zerouno. www.zerouno.org
There is nothing to prevent a stuck development. I face it all the time with many customers.

When you work as a freelancer, you can find many bumps in the road like when nor your or the employer know what to do next. Your communication skills will sharpen everytime you sit with your employer and have a talk of what to do next. There is nothing wrong to ask "Ok, tell me your ideas and concerns". It's actually a prietty solid technique to create stronger bounds with your employer to find a solution.

"Try something else" it's a perfect situation to ask "What do you have in mind?" and smile.

© Zerouno. www.zerouno.org

Ambiguous request are always there. Like in the previous image, you must master communication skills to become a professional freelancer. Don't just stare at your employers after an ambiguous request, say something! Say "I don't understand what you mean" but end it with "... but I think this works because of the following reasons...". If you fail in communication skills, quit. There is no hope for you.

© Zerouno. www.zerouno.org
Always ask for context. It's plain textbook.

Whenever an ambiguous request comes, you can't say "ok" without understanding what's going on. That's lying and it's devastating for you and your reputation. When in doubt ask for additional information to make a whole. Your employers has a lot of context but sometimes they fail to give it because they think we already have it. It's your job to get it out from their confused minds.

Many other images are available at the author's webpage but I'm not against the author. I'm against narcisist and egocentric developers that also has many of this as their work habits. Remember that you are supposed to be a professional. You know your expertise area and it's always your job to handle the client in the most polite manner.

Thursday, October 15, 2015

Custom styles for Views and Widgets in Android Studio. A complete guide

On my last freelancer project for Android I was hired to create over 60 layouts (screens) for an App. I was told that there was about 2 weeks to complete all of them and I was already working in a different project for 8 hours a day, leaving only 3 hours to do the layouts if I were stupid enough to say yes.

Did I accept it? Yes. Why? Because I was going to use a Style and get it done in one weekend.

How does a style works and why you sould learn right now how to use them?

A Style in Android is very similar to a CSS style for your HTML; you have to define the visual properties in a file and then you can just apply those visual properties to your widgets. This is a no sweat situation where time is not in your side and there is a lot to be done.

When you use a style, the visual properties will remain in the app so you don't have to remember how much padding you are using or what is the color for this and that. The style has all that things declared so you only apply the style into the views you need. Money!

Creating a basic style for Android and applying it

Let's start creating our first style. We are going to make all our EditText to look the same according to what my customer wants: "rounded but not 'cartoonish' with a slight shadow to make it look 3D and witrh blue borders". Yes, my customer said 'cartoonish'.

Mi first assumption was that my customer wanted rounded corners but with a small radius. Maybe he was aware that the guideliness say that is best to avoid "curves" in your designs. "Bubble-like" buttons are not so popular right now. The seccond guess was the "background". I'ts clear what he meant, so we will use a gradient to do that. Lastly, the border will be blue.

How did I create a custom View with no Adobe skills? My XML is very sharp

The first step is to create the overall eye-candy, the "look-and-feel" with XML using a shape.

Go to you drawable folder, right click on it and select New>Drawable resource file.

Use 'edittext_normal_shape' as the name
Once you have the XML we will start using Android properties to define how our Edit Text is going to look.

First, let's make sure that the root DOM element is not <selector>, replace it by <shape>:

<?xml version="1.0" encoding="utf-8"?>
<shape xmlns:android="http://schemas.android.com/apk/res/android"> 
  
</shape> 

Now, lets use a rectangle as the main shape of this image:

<?xml version="1.0" encoding="utf-8"?>
<shape xmlns:android="http://schemas.android.com/apk/res/android"
    android:shape="rectangle">
   
</shape> 

Now we will add a gradient to make the shadow effect:

<?xml version="1.0" encoding="utf-8"?>
<shape xmlns:android="http://schemas.android.com/apk/res/android"
    android:shape="rectangle">
    <gradient
        android:startColor="#FFF"
        android:centerColor="#FFF"
        android:endColor="#F3f3f3"
        android:angle="90">
    </gradient>

</shape> 

The gradient is using 3 colors. The bottom and middle color will be white, and the end color (top) will be grey so there is the shadow effect. We can define the angle of the gradient as a top-bottom color with 90 degrees.

Now lets define the rounded corners:

<?xml version="1.0" encoding="utf-8"?>
<shape xmlns:android="http://schemas.android.com/apk/res/android"
    android:shape="rectangle">
    <gradient
        android:startColor="#FFF"
        android:centerColor="#FFF"
        android:endColor="#F3f3f3"
        android:angle="90">
    </gradient>
    <corners
        android:radius="4dp">
    </corners>

</shape> 

Now, the border line:

<?xml version="1.0" encoding="utf-8"?>
<shape xmlns:android="http://schemas.android.com/apk/res/android"
    android:shape="rectangle">
    <gradient
        android:startColor="#FFF"
        android:centerColor="#FFF"
        android:endColor="#F3f3f3"
        android:angle="90">
    </gradient>
    <corners
        android:radius="4dp">
    </corners>
    <stroke
        android:color="#3d85c6"
        android:width="1dp">
    </stroke>

</shape>

What is this? This is the shape that will be used as image.We are not using any ".jpg" resource. Instead we can provide a valid, well structured description using XML. Actually, you can just use this as a background image for any EditText and the result will be the same as the picture above.

Since I have only 2 weeks to get it done, I will not set the "background" property for each EditText in each layout, let's use this as our Style.

 Open the Project Navigator with <Alt+1> then go to res>values>styles>styles.xml.

The Styles resource file is used to define all of your styles that will be used in your app, as long as you don't define anything there, the system will use the default look using this file with only 1 line of markup:

<resources>

    <!-- Base application theme. -->
    <style name="AppTheme" parent="Theme.AppCompat.Light.DarkActionBar">
        <!-- Customize your theme here. -->
    </style>
</resources>

The element <style> defines a style and will inherit from "Theme.AppCompat.Light.DarkActionBar" which is a main style already defined using the Android SDK. You can override most of the properties here making the "AppTheme" to look exactly how we want it.

Before we can override directly the style of the EditText using the background defined earlier, we need to create it's own style and use it to override. Since we are going to apply it to the EditText, we are inheriting from "Base.Widget.AppCompat.EditText".

Some of the names are very easy to understand. I don't know every item, but since it has "EditText" and "Widget" on it I can be 100% sure that this is an EditText.

<resources>

    <!-- Base application theme. -->
    <style name="AppTheme" parent="Theme.AppCompat.Light.DarkActionBar">
        <!-- Customize your theme here. -->
    </style>

    <style name="CustomEditText" parent="Base.Widget.AppCompat.EditText">

    </style>

</resources>

Now, our "CustomEditText" style exists. It inherits every single property from the regular EditText but we need to override the background using our shape item.

<resources>

    <!-- Base application theme. -->
    <style name="AppTheme" parent="Theme.AppCompat.Light.DarkActionBar">
        <!-- Customize your theme here. -->
    </style>

    <style name="CustomEditText" parent="Base.Widget.AppCompat.EditText">
        <item name="android:background">@drawable/edittext_normal_shape</item>
    </style>

</resources>

Our style is ready to use. From here, you can apply the style mannualy in every "style" property in each of your EditText or you can override the current style defined by the System.

<resources>

    <!-- Base application theme. -->
    <style name="AppTheme" parent="Theme.AppCompat.Light.DarkActionBar">
       <item name="android:editTextStyle">@style/CustomEditText</item>
    </style>

    <style name="CustomEditText" parent="Base.Widget.AppCompat.EditText">
        <item name="android:background">@drawable/edittext_normal_shape</item>
    </style>

</resources>

After these changes, you can navigate to any layout then drag and drop an EditText. You will see how the changes you have done to the style apply to the widget without writting a single line of code in the XML  properties of the widget.


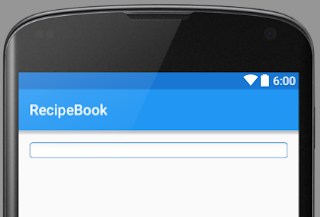
This is the final result. Only XML then drag and drop

As you can see a simple xml can define the background image of a widget but it can also define the behavior.

The client said that the buttons should be circles, they must be in a blue color when enabled and slightly bigger when pressed but gray when disabled. This means that i have to define 3 different backgrounds, one for each state for the button.

State: Default.

Like in the EditText style, i have to create a shape and define some properties to make it look like a circle.

The default state is the "normal" state. When is neither pressed and disabled.

<shape android:shape="oval" xmlns:android="http://schemas.android.com/apk/res/android">
    <size android:height="28dp" android:width="28dp">
    <solid android:color="#1C89AD">
    <stroke android:color="#91999C" android:width="2dp">
</stroke></solid></size></shape>


State: Pressed. 

Now lets make the pressed state, the only difference from the default state is that its slightly bigger.

<shape xmlns:android="http://schemas.android.com/apk/res/android"
    android:shape="oval">
    <size android:height="28dp"
        android:width="28dp"/>
    <solid
        android:color="#1C89AD"/>
    <stroke
        android:color="#91999C"
        android:width="2dp"/>
</shape>

State: Disabled.

And finally let's make the disabled state.

<shape xmlns:android="http://schemas.android.com/apk/res/android"
    android:shape="oval">
    <size android:height="28dp"
        android:width="28dp"/>
    <solid
        android:color="#B6BFC2"/>
    <stroke
        android:color="#91999C"
        android:width="2dp"/>
</shape>

Now, lets create a selectable.

<?xml version="1.0" encoding="utf-8"?>
<selector xmlns:android="http://schemas.android.com/apk/res/android">
    <item android:drawable="@drawable/btn_circle_default"></item>
    <item android:state_enabled="false"
        android:drawable="@drawable/btn_circle_disabled"></item>
    <item android:state_pressed="true"
        android:drawable="@drawable/btn_circle_pressed"/>
</selector>

As you can see, the selectable declares 3 states: default, disabled and pressed. Those 3 sates will have a drawable resource and will have to change from state to state according to the drawables.

Finally, lets go back to our style layout and assign this selectable to the button.

<resources>

    <!-- Base application theme. -->
    <style name="AppTheme" parent="Theme.AppCompat.Light.DarkActionBar">
        <item name="android:editTextStyle">@style/CustomEditText</item>
    </style>

    <style name="CustomEditText" parent="Base.Widget.AppCompat.EditText">
        <item name="android:background">@drawable/edittext_normal_shape</item>
    </style>

    <style name="CustomCircleButton" parent="Base.Widget.AppCompat.Button">
        <item name="android:background">@drawable/selectable_btn_circle</item>
    </style>

</resources>

Now we have a button ready to be used with a custom style.

After creating a set of styles for my app, I still have to match text styles: Titles, subtitles, description text and link texts. The good part is that I just need to adjust some parameters because there is no need for background drawables or states.

TextView Title

I will use the same color as the  button for the title on the textview and the size will be much bigger. Also, since it's a title it will be on the center.

Since I dont need a drawable for this, I can edit this directly from the style file.

<style name="CustomTitleTextView" parent="TextAppearance.AppCompat">
        <item name="android:textColor">#1C89AD</item>
        <item name="android:textSize">32sp</item>
        <item name="android:textAlignment">center</item>
    </style>

The style will be using a text color, a text size and the alignment by editing the items properly named. Using Android Studio 1.4 I can use the autocomplete to see what else I can edit.

Now I have the subtitle remaining. It will use the same color, so I can extend from the previous style

<style name="CustomSubtitleTextView" parent="CustomTitleTextView">
        <item name="android:textSize">22sp</item>
        <item name="android:textAlignment">left</item>
    </style>

As you can see, I'm extending the style from the previous text so the color is inherited but im overriding the text size and aligning it to left.


Apply the styles

Once you have the styles ready, you can set them in the layout editor. Navigate to a layout and lets add a button.


When the widget is created, you can select from the properties pallete the field "style".


With the "style" selected, press <Shift+Enter> and select the "Project" tab from the resources window. Scroll down to find your custom theme and select it. You can see in the preview the style definition. Click "Ok" to apply it.


Once it's completed, you will be able to see the changes in the style right in the layout preview.

This is a button with a custom style

Apply to all widgets.


Back to the story, I was very lucky to see that all widgets had the same style and I was able to override the Android default style with my own instead of setting the style for each widget every time I use one.

From the styles xml, I can just apply the item "style" to the widget, like the following example:

 <!-- Base application theme. -->
    <style name="AppTheme" parent="Theme.AppCompat.Light.DarkActionBar">
        <item name="android:buttonStyle">@style/cutsomButtonStyle</item>
    </style>

Once done, you can just drag an drop a button (in this case) and it will inherit the style from the styles value.

So as you can se, it took some time to write all of the styles but in the end I did an awesome job. My customer was not just happy but he actually was amazed that I was able to do all of the work in such a reduced gap of time.

Thank you for reading!

Friday, October 9, 2015

Creating cutom themes in Android Studio with the Theme Editor.

In the early release of the Android Studio 1.4 a new feature caught my attention. I did not include it in the 6 reasons to start building apps in Android Studio because I think it deserves a complete review and at least a quick tutorial.

The Theme Editor allows you to set up the look and feel of the entire app. The theme will dictate the rules of the look of many widgets like Buttons and Text Views. It can also provide the color setup for tabs, selections, backgrounds and much more and save a lot of coding time.

Why you should define a theme?

Well, a theme will help you to use widgets and styles that match your app context. Instead of setting attributes for every widget and screen, you can define a style by default and focus on the model of the app. So let's not waste time and lets get our hands dirty.

1. Opening the Theme Editor


Press <Ctrl+Shift+A> to open the Action Search Bar, then type "Theme Editor". You will be able to pick the Theme Editor Action.


The theme editor will let you see how will the default theme will behave on every SDK. As you can see, the default theme styles are running in my app but we are going to define a theme of our own.


You can see how the default theme will behave by selecting an API level on the top menu of the Theme Editor. See how it changes when it switch from 23 to 10. (If you can't see other API options download the API from the Android SDK Manager).


2. Create a new Theme


Let's start by selecting the pop up menu from "Theme" and selecting "Create new Theme" and add "myNewTheme" as the name.


As you can see the new theme will inherit all the styles from the "AppTheme". Now let's add some changes so our theme looks unique.

Primary Color:


It's the main color of your app. It should be the most important color and identity of your app but it's not supposed to be the same as the background.

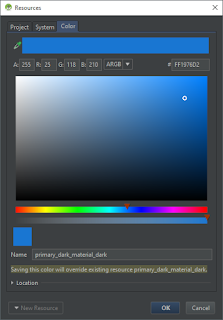
When you click on the pop up menu, a "Color picker" will be shown. Pick a color then click "Ok". As you can see, all of the widgets will update to match (if so) the color now playing in the theme.


Color Primary Dark


It's the color in the Android Bar. The Android bar will hold the status of the phone outside the app. Like battery and Wi-Fi signal. Also the clock. Usually the Color Primary Dark matches the Color Primary.

When you select the pop up menu for this field, there will be a color already pre-selected (The Primary Dark). All your colors seleected from the mixer will be added there so you can pick them faster.


If you are working with the api 23, the background text color will adjust from black to white to match the contrast and make ir more "readable". Pretty cool.

Color accent.


It's the color that will be used in most of the features like the progress bar, checkboxes, and radio buttons. Try to match the primary color but don't make it the same.

Color Foreground


According with the official documentation it will be used for displaying the background for imagery. This means that the background of an image will be that color so make sure you match it with the background color.

Navigation Bar


Will set the color of the bottom bar. The LolliPop Api allows you to paint that bar but with lower versions it will have no effect.

The usual GUI suggest that you paint it the same color as the color primary dark.

Text Color primary


When you try to edit this style, Android Studio will warn you about something werid: "@android:color/primary_text_default_material_light is a private Android resource". Ok... Whetever that means...


Basically it says that we cannot override that style so we have to define a new style for this. Click on the first element on the list and select a color. Then change the name of the "Name" to "my_text_color" so you create a unique color.

Use <my_text_color> in this case


As you can see, there is no longer a  "disabled" state or at least, the disabled state now it's in the same color of the enabled and this is a huge mistake un our UI design. All of the text is behaving the same way. Did we break something?

Well yes and no. The text we had previously defined was taking some attributes from different states:  A default (or enabled) state, and a disabled state. So we are going to do the same; we need to create a text that can respond to disabled, enabled states.

Click again in the Text Color field and move to "Project" tab. Select "New Resource" and select "New color File".


In the menu, use "my_text_style" as the file name and leave everything for default then click ok.

You will have to define your 2 states from the selector from the XML text editor. Lets start with the default state. As you can see I'm using the system color pallete then, I define the default state.

The resulting XML code will be like this one:

  <?xml version="1.0" encoding="utf-8"?><selector xmlns:android="http://schemas.android.com/apk/res/android">    <item android:state_enabled="false" android:color="@color/secondary_text_disabled_material_light"/>    <item android:color="@color/my_text_color"/></selector> 

If you did everything right and if im actually explaining this like it's supposed, you will now see that in the preview thet text has a color for your enabled display and a different one for the disabled.

The Text color primary inverse will replace your current text color when the configuration of the theme changes for a dark theme. Just do the same for the previous step but remember now that the background will be black, so choose a brighter color.

Text color secondary


That will be used for the medium and small text colores. You can change it the same way we have been changing text colors and also for the inverse.

Background.


The window background will have this color. I'm not going to change it because i like how it looks now but let me explain a cool feature this thing has. Click on it and move to "Project". You can choose an image here instead of just a plain color. How cool is that?

At the end of the tutorial this is the result of my theme:


Once you have completed your changes you can just close the editor and all of the changes will be applied in your Layout Editor. Can you say "eye candy"?

There is a lot of room for learning and use of this tool. I can't wait to see how much can be accomplished using it but I won't spoil your fun.

Try it now!

Thank you for reading.